![]() Keyboard Maestro
Keyboard Maestro
Conduct your Mac Like a Pro!
![]() Keyboard Maestro
Keyboard Maestro
Conduct your Mac Like a Pro!
Macros, also known as Shortcuts, are a way of improving your productivity by allowing you to more quickly perform repetitive or frequently required actions, tailoring your Mac to your usage patterns. Each macro consists of a sequence of Macro Actions to be performed together with one or more possible Macro Triggers which define when the actions will be performed. Sets of Macros are collected together in to Macro Groups.
A Macro Group contains a set of Macros. Each Macro Group can be restricted to only a defined set of applications, so you can target particular Macros to particular applications and use the same Macro Triggers (often Hot Keys) in different applications to perform different actions.
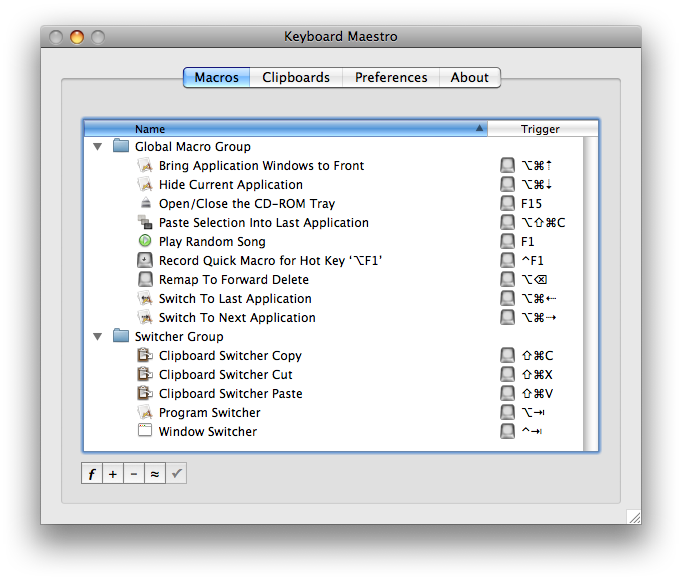
To create a new Macro Group, first launch Keyboard Maestro and click the Macros tab to select the Macros window pane.

Now click the button.

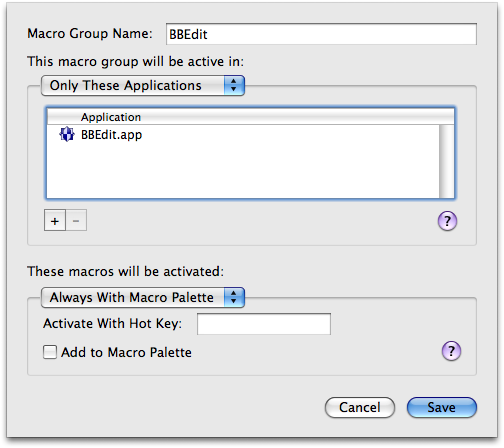
Enter the name of your new Macro Group.
You can choose to target the macros in your Macro Group at specific applications.
By default, Macro Groups and their Macros are active in All Applications, that is they are always ready to be triggered. These are especially useful for Macros that give you instant access to applications or documents.
For example you might have a Macro to launch your email client or word processor, or a Macro to open your financial accounts (perhaps one Macro to open your personal accounts and another to open your business accounts).
To have macros only active in specific applications, set the Macro Group to be active in Only These Applications and add the desired applications to the list.
For example, you could have macros targeted at:
To have macros active everywhere except specific applications, set the Macro Group to be active in All But These Applications and add the desired applications to the list. For example, you could exclude macros from triggering in games. Also, if you have an application that uses lots of function keys for crucial tasks, you could exclude that application to allow you to use the functions keys for macros elsewhere without conflicting with that application.
You can also choose to activate the macros manually with a Hot Key (either for a one shot macro, or toggled on and off) or display the macros is a floating macro palette.
To have the macros in a Macro Group always ready to be triggered, set the Macro Group to be activated Always.
To have macros that are active only after you press a specified Hot Key, set the Macro Group to be activated Once After Hot Key. The macros in the Macro Group will be enabled when you press the Macro Group Hot Key and will remain enabled until either any macro is triggered or you press any other key. You could use this to create a set of related actions with easily remembered hot keys that will not conflict with normal use because they are not activated until you press the group Hot Key. For example, you could have a group of macros to launch various applications and so that Command-Control-L activated the group, and then a single letter press launched the application (eg M for Mail, S for Safari, F for Finder).
To have Macros that are active after you press a specified Hot Key, set the Macro Group to be activated by Toggle With Hot Key. The Macros in the Macro Group will be enabled when you press the Macro Group Hot Key and will remain enabled until you press the Macro Group Hot Key again. You could use this to create a set of related actions with easily remembered hot keys that will not conflict with normal use because they are not activated until you press the group Hot Key. For example, you could have a group of macros to move and resize windows and have Command-Control-W activate the group. Then a single arrow key press moves the front window. When the window is positioned, press Command-Control-W a second time to disable the macros.
To have Macros that are active and displayed only after you press a specified Hot Key, set the Macro Group to be activated Once With Macro Palette. The Macros in the Macro Group will be displayed in a floating Macro Palette and enabled when you press the Macro Group Hot Key and will remain displayed until either any macro is triggered or you press any other key. You could use this to create a set of related actions that do not even need a Hot Key. For example, you could have a group of macros to launch various applications like Mail, Safari and the Finder so when you press Command-Control-L, a palette of these macros is displayed and a single click will launch the application.
To have Macros that are active and displayed after you press a specified Hot Key, set the Macro Group to be activated With Macro Palette. The Macros in the Macro Group will be displayed in a floating Macro Palette and enabled when you press the Macro Group Hot Key and will remain displayed until you press the Macro Group Hot Key again. You could use this to create a set of related actions that do not even need a Hot Key. For example, you could have a group of macros to align objects in a CAD program, so when you press Command-Control-A, a palette of these macros is displayed and you can click various alignment options (distribute left-right, alight top edges) and then close the palette by pressing Command-Control-A a second time.
To have Macros that are always active and displayed in a palette, set the Macro Group to be activated Always With Macro Palette. The Macros in the Macro Group will be displayed in a floating Macro Palette and enabled. The palette will close when you press the Macro Group Hot Key and will remain closed (and the macros disabled) until you press the Macro Group Hot Key again. You could use this to create a set of related actions that do not even need a Hot Key and that are available in a Macro Palette. You could make the Macro Group active only in a specific application so that it appears only in that application. For example, you could have a group of macros to align objects in a CAD program, and have the Macro Group active (and hence the palette displayed) only in the CAD program.
Even if the macros are displayed in a Palette, the macros can still have Hot Key (or any other kind of) triggers which will be available whenever the macro group is activate (ie, whenever the palette is displayed).
You can disable or enable a macro group by selecting it and clicking the button. If a Macro Group is disabled, all its contained Macros will be disabled. You can disable or enable a Macro Group from AppleScript with:
tell application "Keyboard Maestro"
  setMacroEnable "Macro Group Name or UID" with/without enable
$end tell
You can change the targeting of an existing group by double clicking on it in the Macros window pane.
To delete a Macro Group, select the macro group, and either close it or select all of its macros as well, then press the Delete key or click the button.
You cannot delete or rename the Global Macro Group.
A Macro consists of a sequence of Macro Actions to be performed together with one or more possible Macro Triggers which define when the actions will be performed. A typical Macro consists of a single action, such as “open a particular file” together with a single Hot Key trigger, such as control-F1.
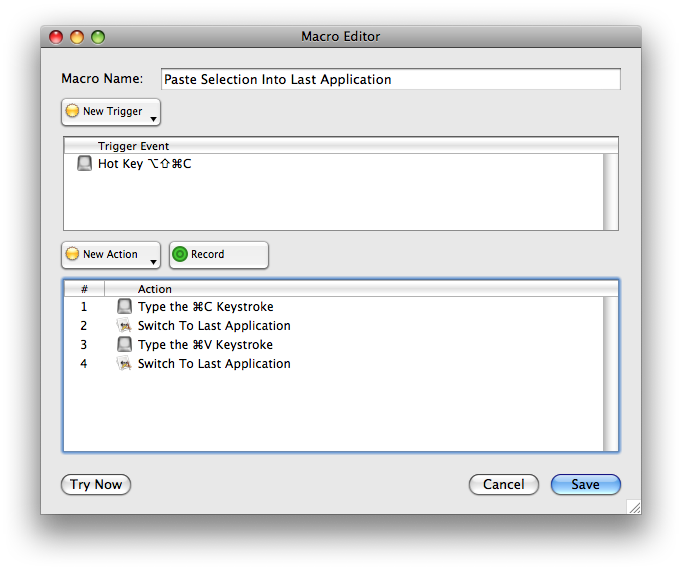
To create a Macro, first launch Keyboard Maestro and select the Macros window pane and then click the button. To edit a Macro, double click it. Either way, the Macro Editor window will be displayed.

Enter the name of your new Macro (you can skip this and it will be named for you based on the action you select).
You can create a new trigger from the New Trigger pop-up menu. There are several Macro Triggers to choose from, the most common being the Hot Key which allows you to execute the Macro at the press of a key. You can define several different triggers and any of the triggers will execute the Macro Actions. You can delete a trigger by selecting it and pressing the Delete key.
You can create a new action from the New Action pop-up menu. There are many Macro Actions to choose from. The actions you include will be executed in order. You can reorder the actions by dragging them around. You can also drag actions between macros and copy them by option-dragging. You can delete an action by selecting it and pressing the Delete key.
An easy way to generate macro actions is to turn on recording and proceed to show Keyboard Maestro what you want to do. Then turn recording back off and look through the actions - chances are you will want to delete or adjust some of the recorded actions to make a robust macro, but this will be much quicker than creating each macro action manually.
Once completed, you can try the macro immediately by clicking the button.
Finally click the button to save the Macro. It will be available immediately (subject to the restrictions of the Macro Group it is contained in). If you select a Macro Group before creating a macro, it will be created within that group. By default, new Macros will be created in the Global Macro Group.
You execute a macro’s action sequence by:
Note that the web server needs to be separately enabled in the Preferences window pane, and all macros are subject to the restrictions of the Macro Group they are contained in.
You can disable or enable a macro by selecting it and clicking the button. You can disable or enable a Macro from AppleScript with:
tell application "Keyboard Maestro"
  setMacroEnable "Macro Name or UID" with/without enable
$end tell
See also the Macro Groups, Macro Actions, Macro Triggers and Recording sections.